
Recessed light or can lights remain a popular option for new home and remodel construction. The logistics of adding them to a home with plaster and lath construction has always presented major problems for the DIY person. The cost of a carbide tipped 6 inch hole saw and the drill to large enough to drive remains an impractical commitment. It just isn't worth the cost to most of us.
Using any of a variety of other tools is always a hit or miss proposition; quite often resulting in unexpected damage to the ceiling and the attendant repairs required. A reciprocating saw will surely rip some of the lath out of place and is very hard to control in such a tight radius. A sabre sometimes called a jig saw is easier to control but usually still rips some lath or causes a plaster fall. A RotoZip or Dremel will burn up a lot of plaster bits and the plaster bits don't do wood.
As a part of an on-going, seemly never ending project back in 2010 I had a lot of time to think about trying something new; something that would work and create the minimum amount of mess and dust. Spending $300 -$400 for tools to make 6 holes was not an option. Spending days repairing ripped off lath and fallen plaster was not a pleasing option. I wanted to do the project using tools I already owned or that could be added at a minimal cost and with the least amount of possible effort.
Admittedly, if you don't own or aren't able to borrow or rent an air compressor for a few hours this isn't going to work well for you. I think most of you can do one or the other. The tools you will need to assemble are:
- Air compressor with a 3 gallon or larger tank and a decent duty rating.
- A RotoZip or Dremel with wood bits
- An air chisel with forked cutting chisel
- Flat screwdriver
- Shop vacuum or stiff brush
- Respirator or high quality dust masks
- Eye protection
The process follows the same rules as with a drywall ceiling. You must layout your pattern, verify where the joists are located, adjust layout to miss any joists, measure and mark your cutouts and finally make your cuts.
I started by marking the center point of each fixture with a +, drilling a small hole, inserted a cut length of wire into the hole and going to the attic to see where the wires showed. After some minor adjustments I was ready to make some cuts. As I was working alone and with a textured ceiling I chose to use the plastic lid of a coffee can as my template and to screw it to the ceiling using the predrilled hole. This composite image shows by template and the resulting trace.
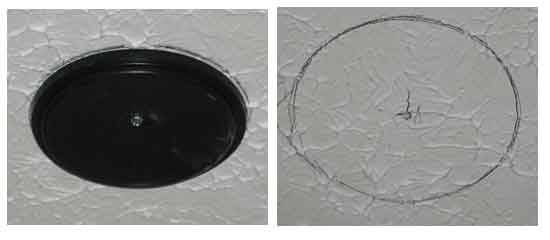
This method held the template firmly in place as I traced the slightly over-sized outline of each light. Some back filling would be required around each can but the trim ring would cover it and no worries about matching the texture pattern. I marked them all before I made the first cut.
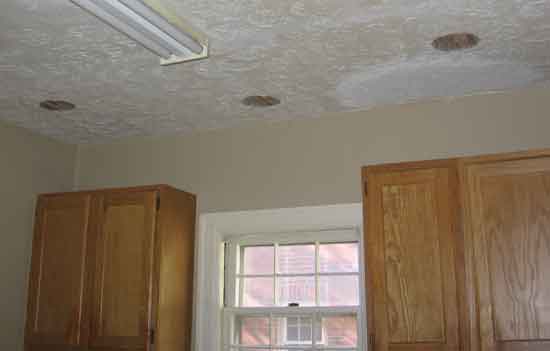
I used the air chisel to cut a series of grooves about 1 inch apart around the circumference of the circle cutting towards the center and then simply traced the dotted line around the circumference to expose the lath. This worked so well that two of the circles came out as whole circles of plaster. An old flat blade screwdriver was used to remove the fingers, the wedges between the laths. This images shows 3 of my six holes with the plaster removed and ready for the RotoZip. The old ceiling light shown will be removed later in the project.
Then using the RotoZip with a wood zip bit I traced the outline and cut the wood lath free. The RotoZip tool because of its high RPMs creates virtually no vibration. The wood zip bits will dull instantly if they come into contact with the plaster so be sure to have extra bits on hand. I used about 3 of them to cut 6 holes. Perhaps your hand will be steadier than mine but I suggest you have extra bits on hand. The Dremel tool will do the same job but slower.

