
As we pointed out in other articles in this section, you may find three distinct types of plaster walls, masonry, lath, and plasterboard. We have already discussed how to install stuff on the masonry type in our article "Installing Window Treatments on Masonry Walls" which is located in the Window Treatment section so we won't repeat that information here. Whether it is drape, pictures or anything else the process is pretty much the same.
The biggest fear people seem to have about hanging stuff on plaster walls is that it will fracture or pop the plaster when they pound the nail into the wall. If you have ever done it, seen it happen or viewed the aftermath from such a fiasco then I can understand your timidity.
I have actually experienced almost a square foot of ceiling falling to the floor while trying to install a single screw. It really wasn't my fault. It was an older building where a little water had condensed or dripped for a many years. Such things can happen but they are the exception rather than the rule.
One should be more careful when installing stuff on an exterior wall on the "hard weather" side of a building. The "hard weather" side is the side of the building where the bulk of the hard weather originates and experiences the more prominent weather extremes. Here it is the south or south-west side of a building.
Whether we are dealing plaster and lath or plaster over plasterboard, it doesn't have to end like that. Only the first 1/8" of either wall is really hard, brittle and tough. If you can penetrate that short 1/8" you will almost never have such a disaster befall you. Do take note I said almost never.
A small picture hook that will hold up to 20 pounds comes with a fairly small nail and that nail has a sharp point. Pounding it in with a hammer is the wrong way! Small repetitive taps from a moderately heavy screwdriver, tack hammer or any other tool will do less damage to the wall than a couple whacks with a big hammer. With some pictures and other items you are forced to use this type of hanger or just a small nail.
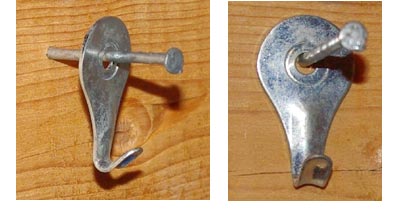
But the best way of all is to use a Molly-Hook and a screw or the correct hollow wall anchor for your particular installation. I thought Molly-Hook was a registered trademark but was unable to find a reference for it. The place I buy them from calls them wall hooks. The composite photo below shows a molly hook profile and full on view. Notice that the screw hole has a removable knockout for larger screws.

The beauty of using this style of hook to hang your picture or other item is that you are ready for just about any situation. An inch and a half #6 screw works very well if you picked a spot with lath back there, a plastic drywall anchor works well for light stuff, a hollow-wall metal anchor or toggle bolt works well for heavier stuff where there is no lath or on plasterboard.
Now all you have to do is get through that first 1/8" of hard coat without a fracture. There is a simple magic act for that also; it is called a TEK screw. These are sold as self-drilling, self-tapping screws for installing stuff where there are metal frames or studs. The #6 x 1/2" hex-head one is perfect for drilling through that hard coat. Depending on how hard your plaster is you will be able to start 2-4 holes before you burn the screw up. Trust me at 3 cents or so for each screw it is cheaper and safer than drill bits. The dust from the drilling can be captured by loosely holding a slightly damp white paper towel under and around the area being drilled.
All of these items including a bit with a hex-head are available at the BORG or a full service hardware store.