
You may need to learn a few new words to fully understand this article. The first time each word is used we will include the definition in ( ).
Draperies on a traverse rod, (a drapery rod with string and carriers to allow for opening and closing), are usually installed as fully operating panels and less often they are just side panels that do not fully close but some horizontal movement is desired. Your first chore is to know or determine which you are installing.
Where draperies are used as side panels the rod face (the left to right width measurement of an installed rod) is either a couple of inches less than the board mounted valence that goes over them or the width needs to extend a certain number of inches to the left and right of the window casing.
For fully functional draperies installed on a traverse rod the math is a critical component of the installation.
Determine the rod face and finished length, (length of the drapes from top to bottom), measurement. If you are installing custom draperies, this information should be known or provided. In the event it was not, you need to measure the length of the panels and the total pleated width, (the measurement of a panel or panels across the pleated top portion). On a single traverse rod your rod face is: total pleated width minus 12 inches for overlap, (extra fullness added to panels to allow them to properly close, usually 4"), and returns, (the portion of the drape that extends from the front of the rod to the wall, normally 4" on each side for a single traverse rod and 6" on each side for double ).
With ready made drapes the package typically says something like 120 x 84. The 120 is the total pleated width. A pair of 120 x 84 ready made panel will actually fit a window with a maximum rod face of 108". It is not necessary to stretch a panel to the full pleated width of the panels some extra fullness on the two outsides is not a bad thing.
In a normal installation the rod should be centered on the window. Measure the window width from frame to frame. Subtract this amount from your rod face measurement. Divide the result by two. This is the amount your brackets will be installed to the left and right of the frame.
Mount the top of the rod at the exact stated length above the floor. If the drapes are 84 inches the top of the rod should be 84 inches off the floor. The reasoning for this will be explained in the pinning section.
 Adjust rod to meet in the center.
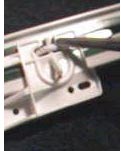
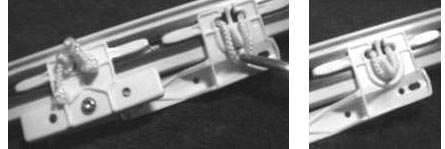
With a new rod, normally the process of pulling it fully open and then closing it will center the two master carriers (the parts to which the strings are attached) in the proper position. If it does not, the under lap master carrier can be moved by hand while you firmly hold both pieces of the string. The under-lap master is normally the one on the left as you view the rod from the front. The rod is properly adjusted when the two master carriers overlap at the exact center point of the window. It is now necessary to lock them in place. The picture to the left shows the string position as the rod comes from the box. The photo on the left below shows it being pulled into position and the one on the right shows it fully locked into place.
Adjust rod to meet in the center.
With a new rod, normally the process of pulling it fully open and then closing it will center the two master carriers (the parts to which the strings are attached) in the proper position. If it does not, the under lap master carrier can be moved by hand while you firmly hold both pieces of the string. The under-lap master is normally the one on the left as you view the rod from the front. The rod is properly adjusted when the two master carriers overlap at the exact center point of the window. It is now necessary to lock them in place. The picture to the left shows the string position as the rod comes from the box. The photo on the left below shows it being pulled into position and the one on the right shows it fully locked into place.
This article continues in part two.
This article or portions of this article were previously published in a significantly different form on two websites owned by the author, window-wizard.net and lexkyweb.com/windows. Those articles are no longer available at those locations. Copyright is renewed with this revised publication (01-31-2010).

