
I suggest that the Harbor Freight Multi-Function tool using a carbide blade combined with a rotary tool like the RotoZip or Dremel as the best combination I ever used to cut electrical outlet holes in a home with plaster and lath construction. Over the years I did the job many different ways. My very first project back in 1973 utilized a flat bladed screwdriver, hammer and keyhole saw. That was so tedious I still remember it. Then I added a jig saw and dropped the keyhole saw. None of these methods resulted in a clean cut. Both the keyhole saw and the jig saw tended to vibrate the lath and break off the plaster fingers. The jig saw was worse than the keyhole saw. There was always a mess to clean and damage to patch. This method eliminates the wall damage but you will still have the mess.
As a part of this 2010 project I needed to add a couple of electrical outlets and relocate one. I had the tool and I owned the blade so I decided to try something new.
As always it is important to miss any studs inside the wall and then use an old work box, the one with the ears is my choice though there are a couple of different style on the market. Using this style box one simply cuts a hole the size of the box, fishes the wire to the box and tighten two - four screws to secure it in place. These boxes are designed for old work in drywall so take note that the screws may not be long enough if your plaster has deep fingers (the ooze behind the wall) or is extra thick. Longer screws can be purchased at the blue or orange stores as well as at any hardware store.
The image below is a 3 gang old work box installed in drywall. The view is from inside the wall. A 3 gang box is sometimes hard to find at the BORG or even a real hardware store.

The safe process is to locate and draw a level line where you want the bottom of the box. Do keep in mind that level and visible level may be two entirely different things in an older home. The outlet does not care whether it is level or not so I usually start my measuring up from the floor an equal distance about 4" apart and drawing a horizontal line that represents the bottom of the box.
Then using a tape measure you want to lightly pencil in the corners of your box, drill a small hole somewhere close to the center and insert a length of stiff coat hanger which you previously bent into an L shape. The leg of the L needs to be at least 2 inches. Insert that end into the hole you drilled and gently pull it back flush to within 1/2" of the inside of the wall. If you can rotate it 360 degrees without hitting an obstruction you are good to proceed. If you encounter a stud or other obstacle you probably need your box location left or right to clear the obstruction.
Set the bottom of your old work box on the line you drew and trace the outline of the box. Then use the carbide half-moon blade to cut the outline of the box. It will be necessary to adjust the half-moon blade angle to get a clean cut at the corners. I find it easier to cut the long lines and then use those as a guide to cut the corners. With steady hands and good tool control I can think of no reason why you cant cut the corners first. You will now have something that looks like this.
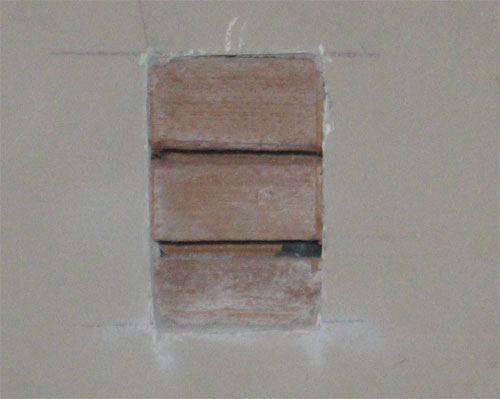
Notice that the corners still have small bits of the scratch coat remaining. That and the fingers between the lath are easier to remove with a flat blade screwdriver, stiff putty knife or even a utility knife. Then as we did in the recessed lighting article we use a RotoZip or Dremel tool and wood zip bit to cut out the lath. This creates far less vibration than any other method I used.
Fish your wire to the box, set the box in the hole and secure it in place. You can caulk or pack drywall mud into any small gaps (to reduce cold air penetration) or simply leave it as it is for interior walls..

